
Creative Process
Why Music Transitions Matter: Rules for DJs and Producers
Why Music Transitions Matter: Rules for DJs and Producers
! Female DJ mixing live at club booth
Transitions control the narrative, energy, and perceived quality of your music.
By DRVVYN · · 14 min read

Why Music Transitions Matter: Rules for DJs and Producers

Transitions control the narrative, energy, and perceived quality of your music. They are the difference between a set that feels like a continuous emotional journey and one that sounds like a playlist someone hit shuffle on. Right now, before you read another word, try three things: check that your next section change lands on a phrase boundary, make sure only one bassline is playing at full volume at a time, and strip an instrument out before adding a new one. Those three moves alone will tighten almost any arrangement or live set.
Pro Tip:Build a simple pre-session checklist in your DAW notes: phrase boundary, bass swap, additive or subtractive move. Run it before every bounce or every gig.
- Check phrase alignment before anything else
- Manage your low end with a decisive bass swap, not a slow crossfade
- Use additive or subtractive arranging to signal section changes without jarring the listener
Table of Contents
- What counts as a musical transition?
- How transitions shape story, emotion, and listener attention
- How transitions work technically
- Studio techniques that make transitions feel inevitable
- DJ techniques that protect groove and control crowd energy
- Why transitions fail and how to fix them fast
- What research and experts say about transitions
- Your pre-session transition checklist
- Key Takeaways
- The part most producers skip
- Useful sources and further reading
What counts as a musical transition?
A transition is any boundary that moves a listener from one musical state to another. In composition, that might be the moment a verse releases into a chorus. In a live set, it is the handoff between two tracks. The word “transition” covers a lot of ground, and knowing which type you are working with tells you which tool to reach for.
- Harmonic: Pivot chords, modulations, or a key change that reframes the tonal center. A classic example is a half-step key lift in the final chorus of a pop song.
- Rhythmic: Phrase-length shifts, tempo changes, or a drum fill that signals a new section is coming.
- Textural: Adding or removing instruments to thin or thicken the arrangement. Dropping the bass and drums for four bars before a drop is a textural transition.
- Timbral/effects: Filter sweeps, risers, reverse reverbs, and noise rises that change the sonic color without necessarily changing the harmony or rhythm.
- Structural: The formal section change itself, such as verse to chorus, breakdown to drop, or intro to first verse.
Most real transitions are hybrids. A DJ crossfade is simultaneously timbral (EQ shift) and rhythmic (beat alignment). A track transition that uses a riser to bridge two tracks is timbral and structural at once. Naming the type helps you diagnose what went wrong when a transition feels off.
How transitions shape story, emotion, and listener attention
Transitions are the composer’s primary tool for shaping perceived narrative and controlling emotion. They do not just connect sections. They tell the listener how to feel about what just happened and what to expect next.

The mechanism is expectational framing. When a transition is well-crafted, it builds tension that the next section releases. That tension and release cycle is what keeps a listener suspended in the music rather than drifting. Poorly handled, a transition breaks that suspension, and the listener suddenly becomes aware they are hearing a recording, not living inside a story.
Motif carryover is one of the most underused tools here. Carrying a melodic fragment, a rhythmic pattern, or even a single sustained note from one section into the next creates continuity that the ear recognizes before the brain does. As Brettworks notes, DAW arrangement often reveals seams precisely because producers rely on region alignment instead of crafting those dovetailing connections manually.
- Transitions signal emotional state changes, cueing listeners to shift their attentional posture
- Surprise versus inevitability: the best transitions feel both unexpected and completely right
- Cognitive friction drops when transitions are coherent, keeping the audience present
Pro Tip:Design each transition as a story beat, not a decorative effect. Ask yourself: what does the listener need to feel at this exact moment? Then choose the technique that delivers that feeling, not the one that sounds impressive in isolation.
How transitions work technically
Technical choices determine whether a transition reads as natural or jarring. The craft lives in two layers: musical structure and signal-level behavior.
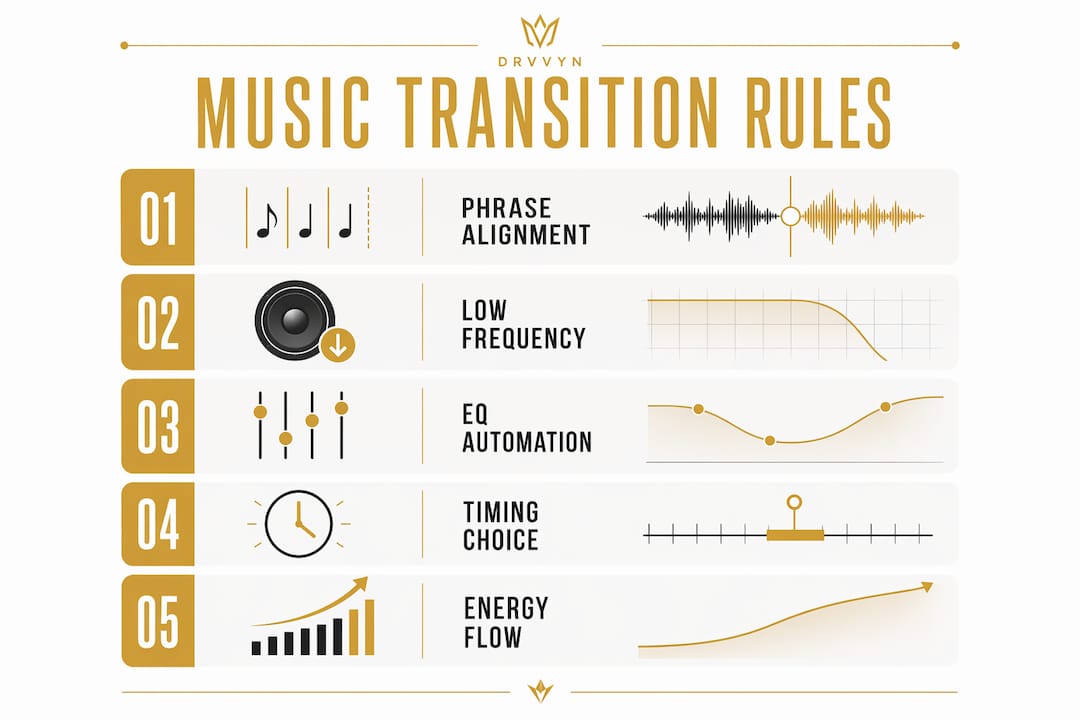
Phrase alignment is the foundation. In 4/4 club music, phrase windows of 16–32 bars are the standard for transitions because musical phrases resolve on those boundaries. Dropping a new element mid-phrase is like cutting a sentence in half. The listener’s ear expects resolution, and when it does not arrive, the groove collapses.
Low-frequency management is where most amateur transitions fall apart. Two basslines playing at full volume simultaneously cause low-frequency masking, muddy the mix, and trigger limiter action that squashes the whole track. The fix is a decisive bass swap on a phrase boundary, not a slow crossfade. One bass in, one bass out, on the beat.
Signal-level tools create the sense of motion that makes a transition feel alive rather than mechanical. iZotope’s production guidance points to EQ sweeps, volume automation, filter automation, reverb tails, gated drops, and transient shaping as the core toolkit.
| Musical mechanism | Audible effect | Typical fix |
|---|---|---|
| Phrase misalignment | Groove collapses, feels rushed | Move transition to 16 or 32-bar boundary |
| Dual basslines | Muddiness, limiter clipping | Decisive bass swap on phrase boundary |
| Abrupt level change | Jarring, breaks immersion | Volume automation curve over 2–4 bars |
| No frequency motion | Transition feels static | EQ or filter sweep through the blend |
| Missing reverb tail | Sections feel disconnected | Carry reverb tail from outgoing section |
Pro Tip:In your DAW, solo the outgoing and incoming tracks together and listen only to the low end. If it sounds muddy in solo, it will sound worse in the full mix. Fix the bass swap first, then address everything else.
Studio techniques that make transitions feel inevitable
The organizing principle behind every great studio transition is contrast plus inevitability: create clear contrast between sections, but make the handoff sound like it could not have gone any other way. iZotope’s arrangement guidance and the Punkademic tutorial both emphasize that every boundary is a craft decision, not a default.
Concrete techniques producers use:
- Additive arranging: Bring in one new element at a time leading into a new section, building anticipation without overwhelming the listener
- Subtractive arranging: Strip elements away before a drop or verse return to create space and signal change
- Dovetailing melodies: Let a melodic phrase from the outgoing section carry one or two beats into the incoming section before it resolves
- Reverb tails and reverse reverbs: Let the reverb of the last note in a section bleed into the next; use a reversed reverb as a riser that feels organic rather than preset
- Drum fills and snare rolls: Classic for a reason. A four-bar snare roll builds anticipation; a two-bar fill signals a drop
- Filter sweeps: A low-pass filter closing down over four bars, then opening on the new section, creates a sense of pressure and release
- Automated stereo width: Narrowing the stereo image before a transition and widening it on the new section adds a physical dimension to the change
- Pitch ramps: A subtle pitch rise or fall on a sustained element just before a section change creates tension without being obvious
Avoid relying solely on stock plugin risers. They are recognizable, and overuse makes your arrangements sound generic. Hand-craft at least the final two bars of every major transition using automation rather than a preset. A solid plugin workflow gives you the routing flexibility to automate multiple parameters simultaneously without cluttering your session.
Pro Tip:Loop the last four bars of the outgoing section and the first four bars of the incoming section on repeat. Audition your transition in that loop until it feels inevitable. If you are still noticing the seam after ten listens, the transition needs more work.
DJ techniques that protect groove and control crowd energy
For DJs, transitions are live decisions about energy direction. Three rules govern every handoff: phrase alignment, the one-bass rule, and energy intent. Get those right and the technique almost chooses itself.
VibesDJ frames transitions as a craft built on three core decisions: when to move, which technique to use, and how to handle tempo or key gaps. That framing maps directly to the three rules above.

Phrase alignment in practice: Most dance music changes in 8, 16, or 32-bar blocks. Dropping a new track at bar 17 of a 32-bar phrase is how you get a train wreck even when the beats are perfectly synced. Count the phrase, not just the beat.
Core live techniques:
- EQ blending: Trade the lows between tracks using the low-EQ knob. Kill the bass on the incoming track, blend it in over 16–32 bars, then cut the outgoing bass as the new one rises
- Echo-outs and echo-ins: Use a delay or echo effect to wash out the outgoing track before the cut; echo-in the new track for a smoother entry
- Bass swaps: On the phrase boundary, cut the outgoing bass to zero and bring the incoming bass to full in one decisive move
- Cut-to-one: Drop everything except one element (usually the kick or a vocal chop) for a bar, then bring the new track in full
- Spinbacks: A dramatic, high-energy technique for genre shifts or crowd resets; use sparingly
- Halftime and doubletime bridges: When BPMs are far apart, halftime or doubletime phrasing bridges the gap without a jarring tempo jump
- Harmonic mixing using Camelot logic: The Camelot Wheel maps keys so adjacent numbers are harmonically compatible. Moving one step around the wheel keeps blends musical; jumping across creates tension that can be intentional or disastrous
Pro Tip:Set phrase markers in rekordbox or Serato before the gig. Pre-map your EQ automation where your software supports it. Experienced DJs design blends in advance so the live performance is about reading the room, not solving technical problems under pressure.
Why transitions fail and how to fix them fast
Most bad transitions come from timing, frequency, or energy mismatch. Fix the mismatch, not the symptom. Adding more effects to a transition that is already broken makes it louder and more broken.
Common mistakes and direct fixes:
- Mixing mid-phrase: The groove collapses and the crowd feels it before they understand it. Fix: move to the nearest 16 or 32-bar boundary.
- Two basslines at once: Low-frequency masking muddies the mix and triggers the limiter. Fix: decisive bass swap on the phrase boundary, not a crossfade.
- Over-filtering or over-FX: A transition buried in reverb, delay, and filter sweeps all at once loses clarity. Fix: choose one primary effect and let it do the work.
- Mismatched key: Melodic clashes that sound wrong even when the timing is right. Fix: move to a percussive section of the outgoing track before introducing the new melody, or use Camelot-compatible keys.
- Abrupt level changes: A sudden volume jump or drop breaks immersion. Fix: automate a smooth curve over two to four bars.
Quick diagnostic workflow: isolate whether the problem is harmonic (key clash), rhythmic (phrase mismatch), or spectral (frequency collision). Solo the two tracks together and listen for each issue in sequence. Harmonic problems reveal themselves immediately. Rhythmic problems show up as a sense of rushing or dragging. Spectral problems sound like mud or harshness in a specific frequency range.
Pro Tip:In a live set, always have a fallback: an echo-out that buys you four bars, or a cut-to-one that resets the groove. A graceful recovery from a bad transition is invisible to most crowds. A panic move is not.
What research and experts say about transitions
Listeners prefer coherent transitions, and the evidence for that preference runs from academic research to practitioner consensus. A streaming-session study found that recommendation models accounting for audio-state transitions and avoiding abrupt shifts increase user satisfaction, which points directly to a perceptual reality: the ear notices and rewards smooth handoffs.
The crowd hears the connection between songs more than the songs in isolation. A great selection can still feel awkward if the handoff is late, cluttered, or jarring.
On the production side, Punkademic’s arrangement tutorial argues that every boundary is a craft decision, and that uncrafted seams make a track feel like a playlist. That is the artistic version of the same perceptual truth the streaming research surfaces.
DJ-specific evidence reinforces the same rules from a performance angle:
- VibesDJ’s complete transitions guide codifies phrase alignment, the one-bass rule, and energy direction as the three foundational decisions in any live transition
- VibesDJ’s technique overview documents 16–32-bar phrase windows as the standard for 4/4 club music, with halftime and doubletime bridges for tempo gaps
- MusicScene’s song structure lessons frame transitions as the connective tissue of songs, managing momentum, dynamics, and harmonic flow
- Vincent Sebastian’s psychology essay argues that transitions function as state-change signals, cueing listeners to shift emotional posture, and that a well-placed transition can propel an audience into a new state of consciousness
Your pre-session transition checklist
The checklist below condenses everything in this guide into a routine you can run before every bounce or every gig.
- Check the phrase boundary: Is your transition landing on bar 16, 32, or another natural resolution point?
- Check the bass swap: Is only one bassline at full volume at any moment?
- Check key compatibility: Are the two sections harmonically compatible, or do you need a percussive bridge?
- Automate a movement: Have you added at least one automated parameter (EQ, filter, width, volume) to create a sense of motion through the transition?
- Audition on monitors or PA: Does the transition hold up at volume? Low-end problems that are invisible in headphones become obvious on speakers.
- Keep a fallback: Do you have an echo-out, a cut-to-one, or a loop point ready if the transition goes wrong live?
Pro Tip:Build a DAW session template with transition markers pre-placed at 16 and 32-bar boundaries. For live sets, use your DJ software’s cue point system to mark phrase boundaries before the gig. A structured production workflow that includes these markers saves you from solving timing problems under pressure.
Key Takeaways
Transitions control musical narrative, energy, and perceived quality — and the three rules that fix most problems are phrase alignment, the one-bass swap, and additive or subtractive arranging.
| Point | Details |
|---|---|
| Phrase alignment is foundational | Land transitions on 16 or 32-bar boundaries to preserve groove and listener expectation. |
| One-bass rule protects the mix | Never let two basslines play at full volume simultaneously; swap decisively on the phrase boundary. |
| Contrast plus inevitability | Create clear contrast between sections, but share an element or automate an energy curve to make the handoff feel natural. |
| Transitions are story beats | Design each handoff around what the listener needs to feel, not which effect sounds impressive. |
| Diagnosis before treatment | Isolate whether a failing transition is harmonic, rhythmic, or spectral before reaching for a fix. |
The part most producers skip
There is a tendency, especially early in a production or DJ career, to treat transitions as the last thing you think about. You build the sections, you love the sections, and then you stitch them together and hope the seams do not show. They always show.
What separates arrangements that feel alive from ones that feel assembled is the same thing that separates a great live set from a playlist: intention at the boundary. The transition is not the space between your ideas. It is where your ideas prove they belong together.
The research backs this up. Listeners respond to coherent audio-state transitions at a satisfaction level that recommendation algorithms now try to replicate. That is not a small thing. It means the ear is always evaluating the handoff, even when the conscious mind is not.
The deeper truth, though, is that transitions reveal your understanding of your own music. When you know what a section is doing emotionally, you know what the next section needs to feel like, and the transition between them becomes almost obvious. The craft is in getting there: the phrase markers, the bass swaps, the automation curves, the fallback echo-out. But the instinct comes from listening to your music the way your audience does, from the outside, as a continuous emotional experience rather than a collection of parts you built separately.
That shift in perspective is the one technique no plugin can give you.
Useful sources and further reading
- Audio-state transitions and sequential recommendation (Rishabh Mehrotra, RecSys 2020) — Academic research showing that coherent audio-state transitions increase listener satisfaction in streaming contexts.
- DJ Transitions: The Complete Guide (VibesDJ) — Codifies the three core DJ transition decisions: when to move, which technique to use, and how to handle tempo and key gaps.
- Track Transitions: 5 Types Every DJ Should Know (VibesDJ) — Documents phrase windows, one-bass rule, and halftime/doubletime bridges with practical numeric guidance.
- How to create better transitions in your mix (iZotope) — Studio-focused guide covering additive/subtractive arranging, automation, risers, and reverb techniques.
- On Musical Transitions (Brettworks) — Essay arguing that DAW collage reveals seams and recommending dovetailing, common tones, and reverb tail carry as fixes.
- Punkademic music arrangement secrets, part 3: transitions tutorial (FlsAudio) — Practical technique list and the argument that every boundary is a craft decision.
- Musical Transitions: Song Lessons (MusicScene) — Covers harmonic connection, melodic continuity, rhythmic flow, and dynamic change as the four dimensions of transition craft.
- The Psychology of Music: Transitions (Vincent Sebastian) — Psychological framing of transitions as state-change signals and tools for moving audiences into new emotional states.
- DRVVYN Sound — Artist and brand home for DRVVYN, where the principles in this guide shape every release and visual experience.